Show Posts

This section allows you to view all posts made by this member. Note that you can only see posts made in areas you currently have access to.


Messages - louisg94

Pages: [1]
1
General VPS Hosting Discussion / 7 easy steps to secure Windows VPS
« on: June 28, 2021, 02:54:19 AM »
As mentioned above we are going to cover 7 easy steps that you can utilize to secure windows VPS. Let’s go.

Get Rid of the Default Administrator Account
Your usual Windows VPS plan comes with a default Administrator account already set up. While that’s very useful when first installing the operating system, it can prove a liability soon enough. The problem, of course, is automatic brute-force attacks that basically try to guess your username-password combination over and over again. That’s much easier when they already know one username: the default “Administrator” account, of course. There are different ways to get rid of this vulnerability, the easiest and the most fireproof being to simply disable the default Administrator account.
The exact way to do it is slightly different for different Windows versions, but there are certain core similarities. Here we’ll look at the exact steps you need to take to disable the default Administrator account in Windows Server 2019.

Step 1

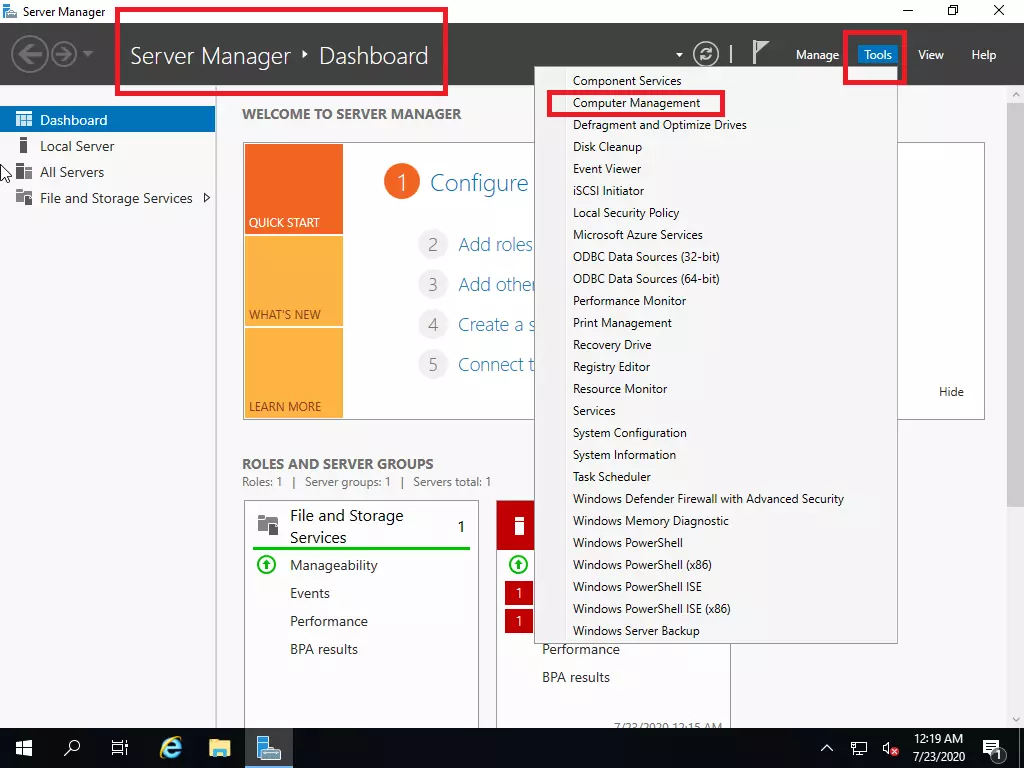
Open Server Manager from the Start screen. From Tools select Computer Management. So basically:
Server Manager → Tools → Computer Manager

Step 2

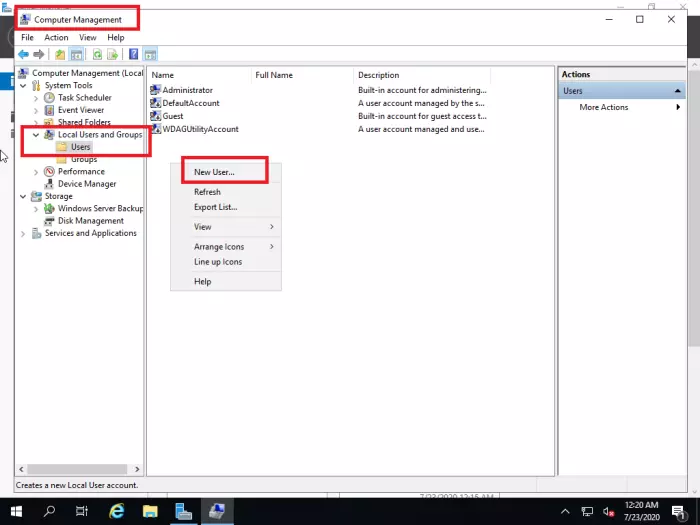
In order to be able to disable the Administrator account, you first need to create another account with administrator privileges. For that, you need to:
From the Local Users menu, select Users. Right-click the list of users and create a New User.

[b=]Step 3[/b]

Now you need a good username for this new account because this will serve as your new administrator-level account. It’s best you refrain from using obvious names like “admin” or “root” and instead use proper names or string-number combinations. In case we’re setting up an account for our own company, a good example would be: “routerhosting-admin-0” or “rtrhst123”. You also need to set a strong password and confirm it. Later on, we will explain what makes a good password, so for now, make sure it’s an alphanumeric combination and at least 8 characters long.
You must also select “Password Never Expires” and make sure the “Account is Disabled” option is not selected (this is the option we’ll use to disable “Administrator” later).

Step 4

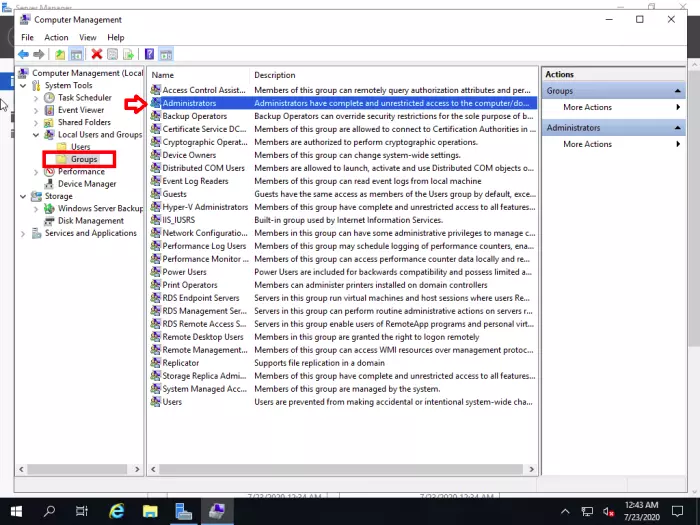
Now it is imperative that you add this account to the Administrators group or else you won’t be able to disable the default account. Go to Groups under Local Users and Groups and select Administrators:
Computer management → Local Users and Groups → Groups → Administrators

Step 5

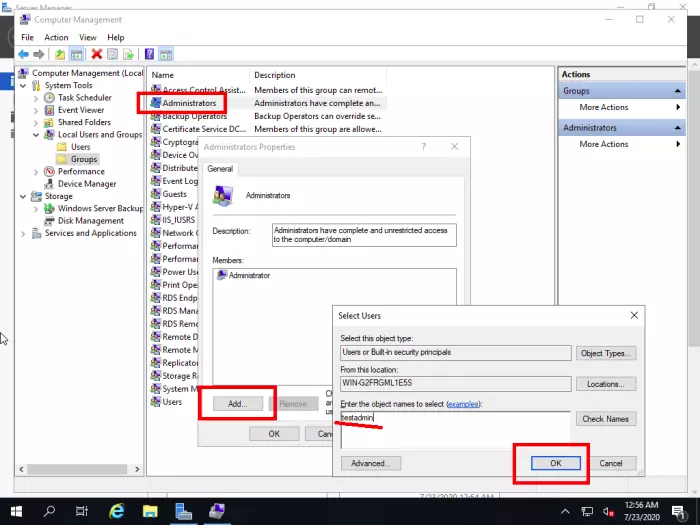
Now just add the newly created account through the properties menu of the Administrators group. Once that is done, we can move on to the final phase of the mission.

Step 6

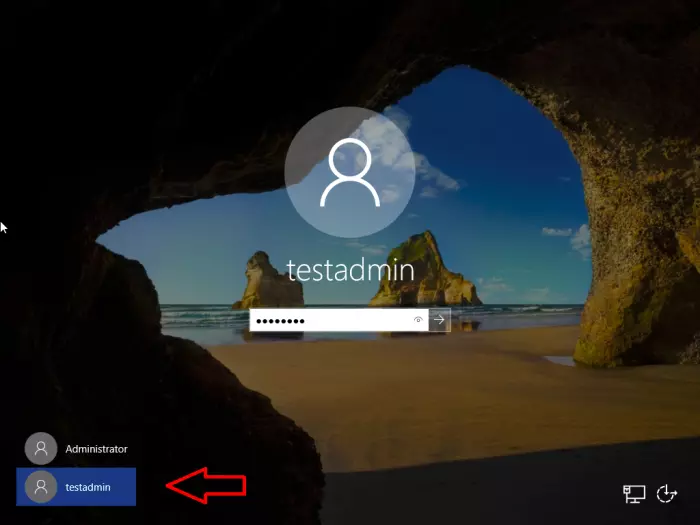
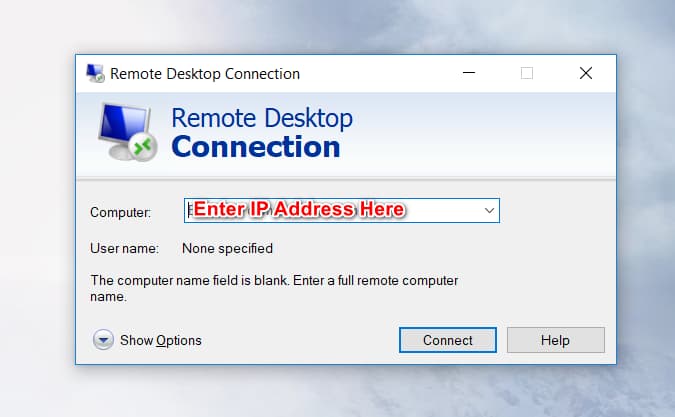
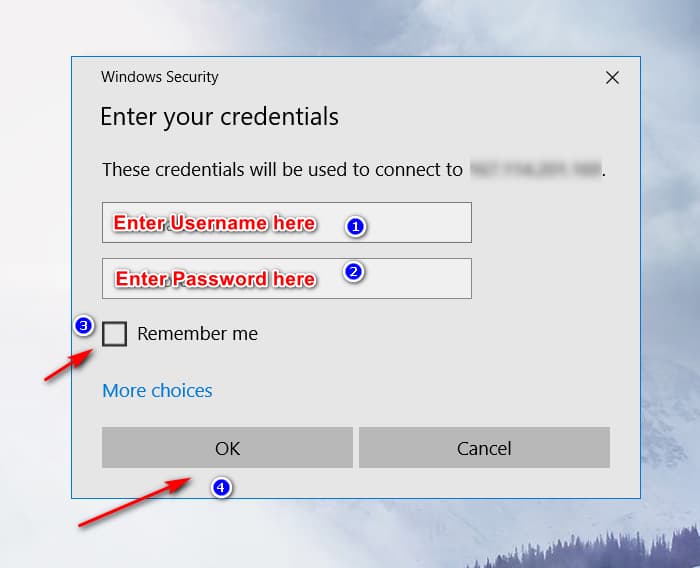
Now we’re finally ready to get rid of that default administrator account for good. First, you must sign out, since you are going to disable it and you can’t do that while still signed in. Once signed out, log in with the newly created account using the password you chose.

Step 7

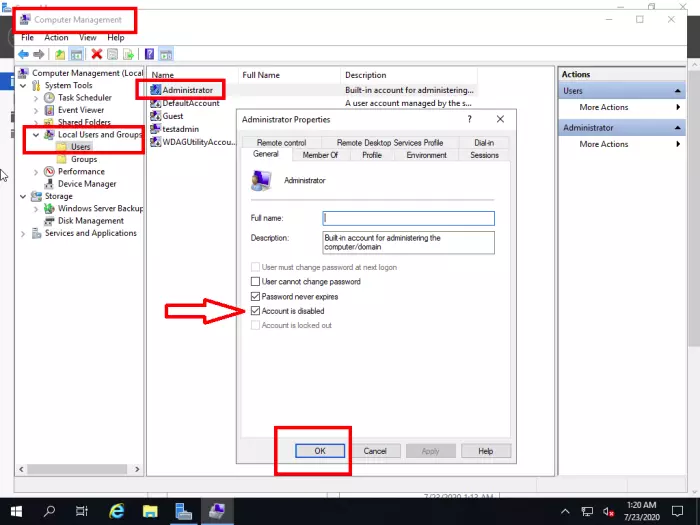
Now that you’re signed in, it’s back to the Computer Management tool for the last time. Go to:
Server Manager → Tools → Computer Manager → Local Users and Groups → Users
Now right-click on Administrator and select properties. Finally, select the “Account is Disabled” option from the properties.
Et voila, you have disabled the Default Administrator Account, taking the first step to a secure Windows VPS. Now hackers and brute-force bots must work twice as hard to log in to your server and that is a definite win. Let’s get some more wins by going through the other methods of securing your Windows VPS.

2
General VPS Hosting Discussion / How to fix RDP internal error?
« on: June 15, 2021, 03:33:03 AM »
Please notice that there are no specific explanations available about what could cause this problem. Based on experience and the potential reasons outlined in the previous section, you can use a few settings and fixes to correct the internal error and get your device back in order.

Adjust Remote Desktop Connection Configuration
You should check the options and make the appropriate adjustments to ensure that you have isolated the risk of any incorrect or misplaced RDP Connection settings. There are a few users who have confirmed that the problem has been fixed by applying the changes outlined here.
Go to the START menu and look for a Remote Desktop Connection. You can also type it in the search function on your Windows system and pick it from the search results.
To view all the options available, click Show Options. Go to Experience and find the Reconnect if the connection is dropped option. Make sure that this option is checked.
You can now try to reconnect by tapping the Connect button. A good number of users have indicated that the problem was resolved after the reconnection option had been reconfigured.

Changing the MTU Value
MTU or Maximum transmission Value is another issue that can cause a communication error. The MTU value refers to the maximum value of the packet you can transmit over a network. Most of the time, reducing the value of MTU will solve the problem for you.
You will need to download a tool called TCP Optimizer to adjust the MTU value. Launch the TCP Optimizer as an administrator. You can select the personalized settings here and set the MTU value as 1458.
You can use any of your favorite TCP Optimization methods. This will help you deal with the issue with a stronger result.

Other Solutions
There are other temporary solutions that may help with this issue. Please note that these solutions can only solve the problem to some degree and might not be effective enough for other issues.

Restart Remote Desktop Service
In certain instances, restarting the Remote Desktop Service does the trick, so you should restart it manually.

Disable the VPN Connection
It is likely that your device is configured to use a proxy or a VPN connection, so as a result, your internet connection will be routed via another server, and this may prevent it from establishing a connection properly.  Disable proxy settings for the internet. Also, make sure you disable any VPNs running on your computer.

Change the Service Startup
It is likely that the Remote Desktop service has been configured in such a way that it is not allowed to start automatically. Adjust the configuration to allow the service to start automatically.

Activate Persistent Bitmap Caching
Another partial reason for this problem is that the “Persistent Bitmap Caching” feature is disabled from the RDP settings. Open the Remote Desktop Connections software and change this setting from the Experience panel.

3
General VPS Hosting Discussion / How to enable audion over RDP?
« on: June 07, 2021, 04:43:17 AM »
You may want to play audio or video sound from your VPS, but you cannot do so because of the virtual nature of the server. You cannot connect external speakers to VPS, but you can certainly route VPS audio to play through your local device.

You can do this by redirecting the VPS sound to the local device via the Remote Desktop protocol. This function is more useful when you run the Forex Trading application (MetaTrader) and don’t want to miss out on those critical Forex Notifications.

The following guide will allow you to redirect audio via the Remote Desktop client.

Remote Desktops
Remote Desktop is the ability to attach to and use a remote computer from a separate device. Remote desktop users can access their computer, open and edit files, and use the software as if they were sitting on their desktop computer.

Employees also use remote desktop software to control their work computers while traveling or working from home. The Remote Desktop Protocol (RDP) is a protocol or technological specification for remote use of a desktop computer.

Enable Audio over Remote Desktop
Remote Desktop Access is quite different from cloud computing, as both allow workers to work remotely. Cloud computing allows users to access files and programs that are stored in the cloud, specifically cloud servers.

By comparison, when using remote desktop software, users have access to their physical desktop device and can only use files and programs installed locally on that computer. Cloud computing is often simpler to use and more effective to adopt for remote employees, but many businesses have not switched to the cloud or are reluctant to do so for safety or regulatory reasons.

Remote desktop applications can use a variety of different protocols, including RDP, Independent Computing Architecture (ICA), and Virtual Network Computing (VNC), but RDP is the most widely used protocol.

RDP was originally released by Microsoft and is used on most Windows operating systems, but can also be used on Mac operating systems. One advantage of RDP is that it doesn’t need a VPN.

It also holds the data safely stored on the desktop of the user, instead of storing it on cloud servers or unsecured personal computers of the user. Besides, RDP allows companies with a legacy on-site IT frame to encourage their workers to work from home.
However, RDP can cause users to experience a lag, particularly if their local Internet connection is slow. This can frustrate remote workers and will their productivity. RDP also has some significant security flaws that leave it vulnerable to cyber-attacks.

Enable Audio over Remote Desktop

1.    Launch your Remote Desktop
Knowing the Remote Desktop (RDP) procedure, you would be able to access your windows VPS as if it were a desktop computer in front of you. To use your remote desktop:

Press the “Start” menu or the “Windows” icon
Enter” mstsc.exe” in the search or cmd box.
This will bring the Remote Desktop Connection application up.
Enter your VPS IP address
Click on “Connect”
Enter the username (Administrator) and your password
Your IP address and password are both found in the setup email sent to you shortly after your VPS has been provided. Now you’re going to be able to access your VPS as if it was a desktop computer in front of you.

2.    Test the Windows Audio Service
Now you need to check that the Windows Audio service is running on your VPS. Type “Services.msc” on the “Start” menu or the “Windows” icon and then click enter. When the “Services” window appears, find the “Windows Audio” service and double-click it.

Change the Start Type from Manual to Automatic Type and click OK. Now press the Play button to start the service straight away. Start to play something with your VPS, probability it’s going to work right now. If it doesn’t, move to the next step.

3.    Enable Audio
First, open Remote Desktop, then press “Show Options.” Now click the Local Resources button. Under “Remote Audio,” press “Settings.” Ensure that Remote Audio Playback is set to “Play on this computer.”

Log in to a VPS server that requires audio enabled. If you hear the windows startup sound when you log in, skip to “Make sure that audio is configured correctly for all applications.” If you haven’t heard the windows startup sound proceed to the next step.

4.    Set up RDP Properties
On the VPS, start tscc.msc on the remote computer. Open the Connections folder on the left panel. Right-click RDP-Tcp, choose Properties, then click the “Client Settings” tab.

Check the “Audio Mapping” checkbox. Notice that all checkboxes under this section are below a blur that says “Disable the following:” so anything checked here is disabled. By default, audio is disabled too.

Select OK, and then close the tsconfig. An alert may be produced that indicates this change will not take effect for any previously connected RDP sessions. Click on that, log out, and log back in.

You should hear the startup sound of the windows at this stage. And if still not, proceed to the next step.

5.    Check the Audio for all Applications
Make sure the Audio is configured correctly for all applications. To do this, take the following steps:

On the VPS, open the sound control panel in “Sounds and Audio Devices.” Click the Audio tab and pick “Microsoft RDP Audio Driver” for the default playback machine, if not already selected.

Check the “Use Default Devices Only” checkbox at the bottom of the dialog and press the Voice tab. Pick “Microsoft RDP Audio Driver” for the default playback system, if not already selected, and then click OK.

It’s done and all of the VPS sounds will now be played on your local computer via an RDP connection.

4
General VPS Hosting Discussion / How to load mt4 on your VPS
« on: May 31, 2021, 03:22:30 AM »
You are a Forex trader and need to load Meta Trader 4 on your VPS? This article will help you to do so. But, before starting the configuration, let us start with some basic definitions:

What is Forex? or Foreign Exchange?
Foreign exchange (Forex) is a known expression defined as a network of buyers and sellers who transfer international currency at an agreed price. The general people, companies, and central banks convert one currency into another in this manner. You have probably traveled abroad at some stage, and chances are you have made a forex transaction as well, but probably for practical purposes. This item is an important purpose of Foreign exchange. However, the vast majority of currency conversion is undertaken to earn a profit. Much of the Forex trading today is moving in the direction of becoming computerized and technological. But, why we need to load Meta Trader for forex vps? or, why need to load Meta Trader 4 on your VPS? In the next paragraph, we will answer you.

Why use VPS for Forex trading?
A virtual private server (VPS) is a special type of server which is housed on the same computer as several other virtual private servers—this is why they are termed “virtual.” Although they’re all located on one machine, they can operate independently of each other. You’re guaranteed a certain amount of space, RAM, and transfer allowance per month. Your VPS has its own dedicated power supply and offers flexibility, stability, and convenience. In very short, VPS is a cloud-based desktop PC.

What is MetaTrader?
Metatrader is a kind of software that connects to the different trading platforms and allows to trade in them through a computer or smartphone. Basically, Metatrader is the link between the two. This software is mostly used by Forex traders who have an opportunity to choose the broker with which they wish to trade, as long as it is compatible with the Forex platform. In this way, and in case it is not compatible, Metatrader acts as a bridge that will allow you to trade with the broker of your choice within the same platform.

With that info in mind, it is time to find out how to load Metatrader 4 on your VPS.

How to Load Meta Trader 4 on your VPS?
Step 1) After signup and ordering a forex VPS you will get an e-mail from vpsforextrader.com Support Team with an IP address, username, and password to connect to.

Step 2) Now, to load Meta Trader 4 on your VPS, open the remote desktop connection program in windows. You can usually find it in your Start Menu under Accessories. It should look something like this:
Step 3) Enter your IP for your VPS and your username, then it will prompt you for your password when you press connect.

Step 4) you should now be connected to your VPS and a fresh empty windows desktop should appear. All that’s left now is to download Metatrader 4 platform installer from your broker. So browse to your broker’s website, and find the download link.

Step 5) once you have Metatrader 4 installed, you will want to get your expert advisor(s) on to the VPS. The easiest way I find to do this is using the local resources tab on the Remote Desktop Connection like so.

Click the options arrow like shown below…

Now click on the local resources tab and you will see this below…

Then click the more button show above under local devices and resources and you should get this…

Checkmark the drives you want to share with your VPS and click OK. Now you’re done and can transfer files between your desktop and your Forex VPS.

Step 6) Install the expert advisor into your Metatrader 4 experts folder and then start the MT4 terminal.

Step 7) Attach the EA to the appropriate charts, and you’re done! Congratulation. You load Meta Trader 4 on your VPS.

Note:
If you want your MT4 terminal(s) to autorun whenever the VPS gets restarted, then just create a shortcut in the following directory. C:\Documents and Settings\Administrator\Start Menu\Programs\Startup
If you want to install multiple MT4 instances e.g. from “KLMNOP US demo”, then just change the install directory to something like C:\Program Files\Metatrader 4 KLMNOP US 2\

5
This article will explain how to establish an RDP (Remote Desktop Connection) to your Windows VPS server. You can easily connect to Windows VPS with RDP. This functionality to remotely connect to another computer is embedded into the Windows Operating system.
Windows allows you to use VPS hosting to log in to the server as an administrator. Therefore, you can access a huge number of functionalities and make lots of changes to the server. You can easily configure and connect to your Windows VPS using RDP. So, first, activate your Windows VPS to find all these features right at the end of this tutorial.

After activation of a Windows VPS server, it takes 15 to 40 minutes to load the Operating System for the first time. Then you can connect to the VPS server with Windows Remote Desktop Connection. On Apple devices, including iPads and iPhones, you can install the Microsoft Remote Desktop app from the App Store. On Linux, you can use Remmina Remote Desktop Client or similar software. On Android, you can use Microsoft’s Remote Desktop client.
Please follow these steps to connect to Windows VPS with RDP (This guide is for Windows users. However, other operating systems or devices work similarly.)

4 Steps to Connect to Windows VPS with RDP

1. Check your email inbox and look for an email from RouterHosting containing the login details for logging into your server:


2. Now open the Remote Desktop Connection software:


3. Enter the IP address (a four-part address number similar to 111.111.111.111) which you have received in the email. (Please make sure you have waited for 20 to 40 minutes before your attempt to connect to the server.)


4. Click Connect, and a Window like below will pop up. Now, enter your username and password (which you have received in the email) and press Ok.


Congratulations! You now are connected to your Windows VPS via Microsoft RDP (Remote Desktop Connection). Now you can use your VPS machine just like your own computer and run any software you wish. Your server can be on and online 24/7. If you are running a program on it, then make sure you do not log off, just disconnect the remote connection.

Most people connect to Windows VPS by RDP for browsing websites like Amazon and eBay for shopping or visiting banned sites. You can also use a Windows VPS as a VPN and set up a virtual private network.
Another use case of Windows VPS can be for:

  • Proxy
    Gaming
    Mine Craft Server
    Forex VPS
    File Sharing Between Your VPS and PC
    Downloading Large Files to Your Desktop
    Windows Web Server
    Windows VPS Back-up
    Managing Audio or Video Files
    Application Testing for Developers
    SEO Tools
    Windows VPS for Forum Posting
    Automation of Software
    Running Scheduled Emails
    Automatic Twitter Follower
If you have further questions related to this topic, please let us know in the comment section below. For any problems with your VPS please open a ticket via our Ticketing System.

Final Thoughts
Connecting to Windows VPS is similar to connecting to other Windows devices and interfaces. On the other hand, Remote Desktop Protocol (RDP) is a protocol that allows users to connect to Windows VPS or Dedicated Servers.

You can directly access the VPS from a remote location. In this tutorial, we explained how to connect to Windows VPS by Remote Desktop. But notice that, Remote desktop connections are available for dedicated servers or Windows VPS. If you are Windows Shared hosting user, you can not connect to the hosting server.

6
General VPS Hosting Discussion / Comparing PCOIP and RDP
« on: May 16, 2021, 06:56:52 AM »
When we compare PCoIP vs RDP, both are remote desktop protocols used for technologies like virtual machines, virtual desktops, remote display, in VMware Blast Extreme, and in some other software such as Citrix.
But they have some differences in their speed, throughput, latency, and their overall performance. This article will discuss some of these differences.
An Introduction to PCoIP and RDP
Nowadays, connecting to a virtual machine in VMWare has multiple methods. You can do it through the VMWare workstation program, or use LogMeIn, TeamViewer, or other remote access software, or you can even do it manually.
You can also connect using a standard Remote Desktop (RDP) Connection through the operating system. Another way for connecting to a VM is by using PCoIP. Later, we will compare these two methods and will talk about their main differences. But first, let’s start with their definitions:
What Is PCoIP?
PCoIP stands for PC over IP. It is one of the best remote connection protocols which provides adaptive technologies for the best user experience. PCoIP technology delivers a high definition and secure remote access experience.
It is also used for securing all the transferring data, revolutionizing the way data is secured in the workplace. Each PCoIP device such as zero-client, thin-client, smartphone, tablet, or laptop can be a secure end-point. Overall, PCoIP ensures that your sensitive information is protected.
PC over IP (PCoIP) was developed by Teradici as a remote display protocol in 2007. It uses the User Datagram Protocol (UDP) which is the alternative for Transmission Control Protocol (TCP). PCoIP initially was a hardware-based desktop virtualization product (such as a virtual desktop, or a remote display) which was designed around a Blade server.
But eventually, the software version of that was developed as well. VMware uses PCoIP for delivering a virtual desktop.
The PCoIP mechanism renders client desktops on a cloud server or network, compressing the desktop’s display pixels, encrypting, and finally transmitting it to the client device.
Then, the client device will decrypt and render the desktop view for the user. This will be equipped with a proprietary chip that enables the user’s PCoIP communication between the server and the client.
What Is RDP?
RDP is short for the Remote Desktop Protocol. It is a multi-channel protocol developed by Microsoft as part of its Remote Desktop Services (RDS) which many people use to access remote desktops. RDP is used by Remote Desktop Connection (RDC) for transmitting data.
In fact, RDP is a supported remote display protocol for those remote desktops which are using RDS hosts, physical machines, shared session desktops, and virtual machines. But VMware Blast display and PCoIP display protocols are supported for published applications.
RDP software is a VNC-based (Virtual Network Computing) application that leverages the Internet to allow the client to access the server, remotely.
The most basic functionality of an RDP software is transmitting the output (display) from the remote server to the client, and sending the client input (keyboard and mouse) to the remote server. In this remote desktop technology, the server listens on both TCP and UDP port 3389, by default.
What Is the Difference between VDI and RDP
VDI and RDS are alternative desktop virtualization and remote desktop technologies. RDS uses Remote Desktop Protocol or RDP as its basis.
Comparing PCoIP vs RDP
As we mentioned before, PCoIP and RDP have some differences in their key features. Some of the key features of PCoIP and RDP are:
•   Using PCoIP and RDP as a VPN: both PCoIP and RDP protocols can be used in place of a company’s Virtual Private Network, when a corporate firewall is not available or is deactivated.
•   High Security and Encryption Level in Connections: using a corporate DMZ, the users can make secure and encrypted connections to Access Points or servers via either PCoIP or RDP.
•   Types of Connections: PCoIP supports nearly all types of client devices.
•   Security with AES: Both PCoIP and RDP support Advanced Encryption Standard 128-bit by default, adding an extra layer of security in connections. Although, you can change the encryption key cipher to AES-256 in PCoIP.
•   Bandwidth Reduction: This capability is available on PCoIP protocol in order to optimize the bandwidth usage on WAN and LAN to increase its speed. Bandwidth will be evaluated by Remote Desktop Commander to track the RDP number which depends on your setting (color, depth, etc.).
•   Multiple Monitors: PCoIP protocol can support up to 4 monitors with a resolution of up to 2560×2160 per display, or up to 3 monitors with a resolution of 4k (3840×1600) for Windows 7 remote desktop. On the other hand, the RDP monitor feature can support a single monitor on the Remote System and multiple monitors (up to 12) on the Local System.
•   Extra Supports: Pivot display, Auto-fit, 32-bit color for virtual displays, ClearType fonts, Audio redirection with dynamic audio quality, Real-time Audio-Video for utilizing microphones and webcams, USB redirection for some users, MMR redirection for some operating systems like Windows or Remote Desktop OS (with Horizon Agent installed), and the option of Copy and Paste in plain text and images are supported by both protocols. RDP supports port redirection, printer redirection, file system redirection, and clipboard sharing as well.
Choosing the Best Display Protocol for You – PCoIP vs RDP
A display protocol is a key component that provides the end-user with a graphical interface. This interface allows the user to communicate with its client.
The established communication will be over a communication protocol, the display server protocol, or simply via a Network-Capable Application Processor (NCAP).
The Display Protocol may vary for some types of clients. You can choose between PCoIP, and Blast Extreme provided by VMware, or select Microsoft RDP (RD protocol).
PCoIP (PC over IP) provides an optimized desktop experience for the entire remote desktop environment including applications, video, audio, images, or for a published application on a WAN or LAN.
Moreover, PCoIP can compensate for a reduction in bandwidth or an increase in latency. All physical or virtual machines which contain shared session desktops on an RDS host, or Teradici host cards, can be used as remote desktops or published applications over PCoIP display protocol.
On the other hand, RDP is a remote desktop technology/protocol available for Windows, Linux, iOS, Mac, Android, and other operating systems.
Moreover, it can be used for serving virtual computers to users in the Azure cloud-computing solution. The communication in RDP is highly asymmetrical (Data flow comes more from the client to the server).
RDP also relies on additional protocols such as TPKT (ISO Transport Service on top of the TCP protocol) to enable the exchange of information units, T.125 MCS to enable multi-channel, and X.224 to set up a connection. But when it comes to security vulnerabilities, RDP has many known issues that are open for hackers to find and exploit.
“BlueKeep” attack in May 2019 was a worm-able vulnerability that allowed remote code execution, and self-propagation which could cause widespread problems, and the Man-In-The-Middle attack which allows hackers to hijack and eavesdrop on sessions, are two examples of RDP’s security shortcomings.
TeamViewer vs RDP!
This article compares RDP with TeamViewer, to help you choose the right tool to remotely manage or access desktops on any device, from anywhere in the world.
Summary
Whether you wish to use PCoIP or RDP, we recommend that you look to your requirements. If you wish to have a high-quality, low bandwidth remote desktop, our suggestion is RDP. But if speed and the level of security matter to you, utilizing PCoIP is recommended.

7
General VPS Hosting Discussion / how does vps help forex trading?
« on: May 09, 2021, 05:15:39 AM »
A Virtual Private Server (VPS) is a virtual machine that operates independently, much like a real computer. Due to the protection and versatility it offers, a VPS is specifically configured according to your needs and is particularly beneficial to Forex traders.
What Does Forex Mean?
Forex is short for Foreign Exchange, a network of buyers and sellers who trade international currencies as well as cryptocurrencies directly among themselves.

The forex market is where many big companies try to hedge their risks through trading currencies via spot, forwards, or futures contracts. It is where most currency exchange in the world happens. And there are investors and traders who are trying to make a profit on the movements of the market.

Among traders pursuing profit in Forex, there are major companies and funds, as well as a very large number of smaller traders and individuals who do this professionally. These retail Forex traders either have expensive dedicated computers for doing their trades, or use cheaper VPS solutions for their reliability and stability.
Automated Forex Trading
A new form of Forex trading has emerged in the last decade. Enabled by the Internet, along with the increasing use of computers and mobile phones, inter-bank and retail foreign exchange markets have been dominated by electronic trading. Along with e-Forex trading, automated Forex trading goes on.

Using freely-available retail Forex platforms, ordinary individuals and small companies can trade Forex. But it needs professional knowledge and can be time-consuming to track the markets and collect information on which trading decisions are based. Automated trading allows individuals with little time or experience to engage in the forex market.
Advantages of Forex Trading with VPS?
There are a lot of advantages to use a forex vps for trading:
Trade anywhere: Working on tasks may be restricted to the place where your computer is located, as with anyone with a desktop PC and not a laptop. Alternatives exist, but you might not feel like buying a handheld smartphone or a laptop, or your broker might not accept mobile trading.  Or maybe you don’t like the interface.In that case, you can connect to the platform from anywhere as long as you have a network connection, even in a hotel or cafe, to log on to your VPS to trade.

Strong security: The best security also comes with VPS systems sold by the best providers. Managed VPS servers are periodically tested to make sure they are running, and 99.9 percent uptime is assured for most enterprises. Generally, you also get antivirus and other applications to guarantee that the device is safe from bugs.

Trade during power loss: In case your power goes out, you will continue to trade if you rely on automation for your trading. When your automatic machine does well even without you monitoring it, even if you can’t get online, you can let it continue to make money for you.

Trading while asleep: Since you are not bound to your desk, you can trade everywhere. Even when your personal device is off, your system can start trading. You can experience more relaxed trading even while asleep.
Reduced breakage and quicker completion of the trade: This is one way that you can benefit from a VPS server, even though you manually place all your entries and do not use automatic trading. A VPS can perform your transactions more efficiently than your computer because the delivery of orders is much quicker.

8
General VPS Hosting Discussion / I need to buy a VPS
« on: February 13, 2021, 07:15:32 AM »
Hello guys, I am looking for a windows VPS. A 2GB I believe would be sufficient or somewhat higher. However, I was hoping I might find something more affordable than vultr but using exactly the exact same quality. got anything?

Pages: [1]