As mentioned above we are going to cover 7 easy steps that you can utilize to
secure windows VPS. Let’s go.
Get Rid of the Default Administrator AccountYour usual Windows VPS plan comes with a default Administrator account already set up. While that’s very useful when first installing the operating system, it can prove a liability soon enough. The problem, of course, is automatic brute-force attacks that basically try to guess your username-password combination over and over again. That’s much easier when they already know one username: the default “Administrator” account, of course. There are different ways to get rid of this vulnerability, the easiest and the most fireproof being to simply disable the default Administrator account.
The exact way to do it is slightly different for different Windows versions, but there are certain core similarities. Here we’ll look at the exact steps you need to take to disable the default Administrator account in Windows Server 2019.
Step 1
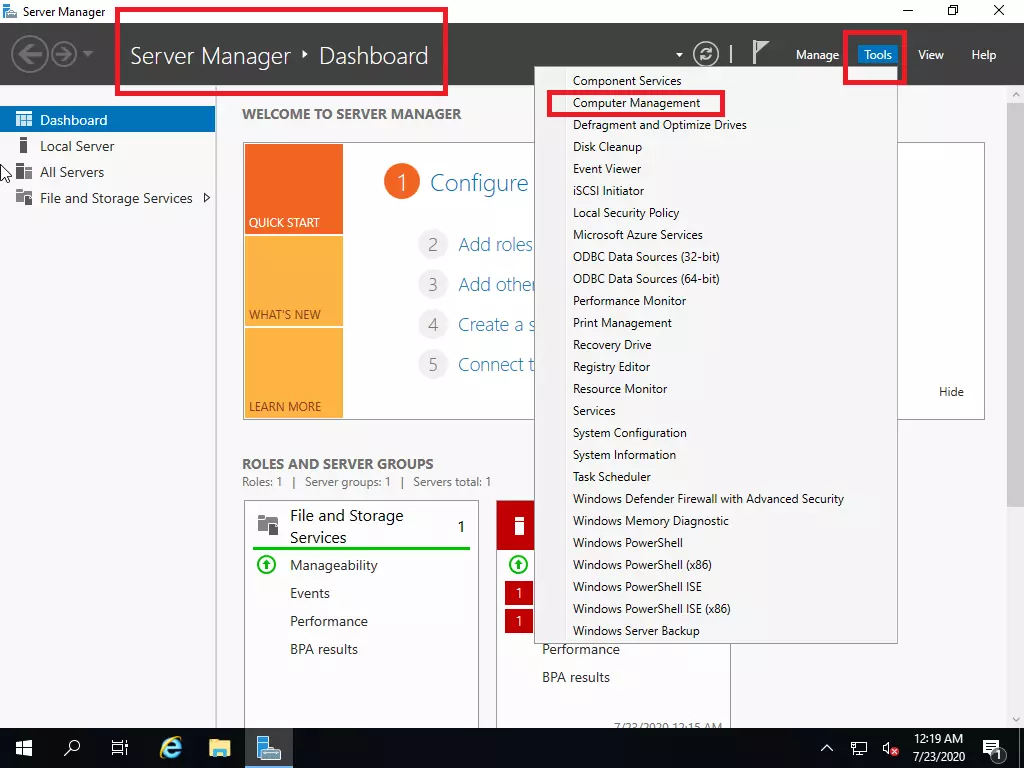
Open Server Manager from the Start screen. From Tools select Computer Management. So basically:
Server Manager → Tools → Computer Manager
Step 2
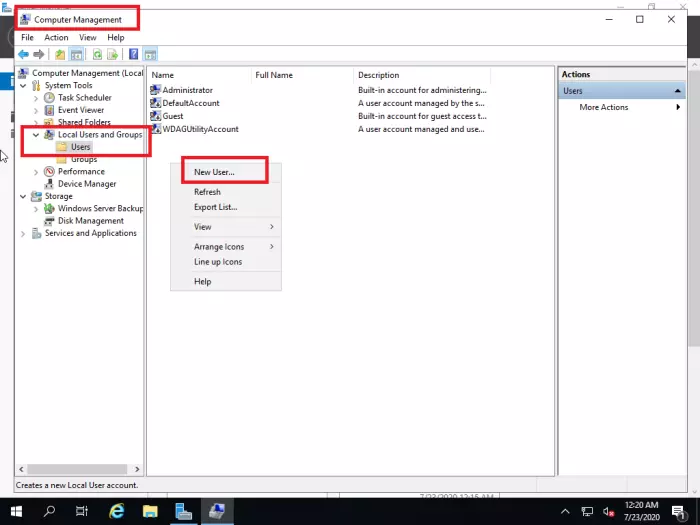
In order to be able to disable the Administrator account, you first need to create another account with administrator privileges. For that, you need to:
From the Local Users menu, select Users. Right-click the list of users and create a New User.
[b=]Step 3[/b]

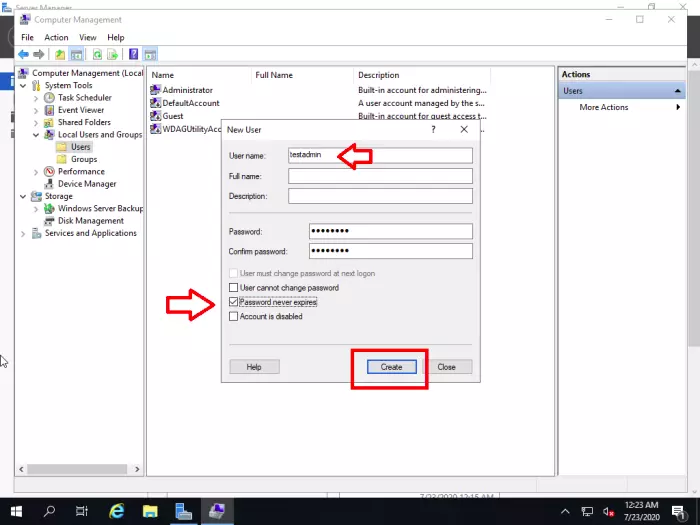
Now you need a good username for this new account because this will serve as your new administrator-level account. It’s best you refrain from using obvious names like “admin” or “root” and instead use proper names or string-number combinations. In case we’re setting up an account for our own company, a good example would be: “routerhosting-admin-0” or “rtrhst123”. You also need to set a strong password and confirm it. Later on, we will explain what makes a good password, so for now, make sure it’s an alphanumeric combination and at least 8 characters long.
You must also select “Password Never Expires” and make sure the “Account is Disabled” option is not selected (this is the option we’ll use to disable “Administrator” later).
Step 4
Now it is imperative that you add this account to the Administrators group or else you won’t be able to disable the default account. Go to Groups under Local Users and Groups and select Administrators:
Computer management → Local Users and Groups → Groups → Administrators
Step 5
Now just add the newly created account through the properties menu of the Administrators group. Once that is done, we can move on to the final phase of the mission.
Step 6
Now we’re finally ready to get rid of that default administrator account for good. First, you must sign out, since you are going to disable it and you can’t do that while still signed in. Once signed out, log in with the newly created account using the password you chose.
Step 7
Now that you’re signed in, it’s back to the Computer Management tool for the last time. Go to:
Server Manager → Tools → Computer Manager → Local Users and Groups → Users
Now right-click on Administrator and select properties. Finally, select the “Account is Disabled” option from the properties.
Et voila, you have disabled the Default Administrator Account, taking the first step to a secure Windows VPS. Now hackers and brute-force bots must work twice as hard to log in to your server and that is a definite win. Let’s get some more wins by going through the other methods of securing your Windows VPS.